Setting Up Facebook Ads
There are two ways that you can go do this:
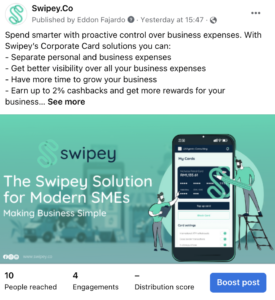
- The simplest way is to boost a post via your page. Buying ads in this way will allow you to kick-start your ads in under 5 minutes. It’s most useful for businesses that are just getting started and if you want to get content in front of a broad audience quickly. It’s less complicated than buying ads via Facebook Business Manager. See our guide on how to do this below.
- Another method is to run ads on Ads Manager via Facebook Business Manager. This requires you to register for an Ads Manager account first before running your ads. You must be wondering why you need an Ads Manager account when you can just run ads via the method above. Well, the answer to this is that the Ads Manager allows you to run a variety of ads based on the objective that you want to achieve like,
- Acquiring new leads
- Driving people to your website
- Getting more calls to your business and so many more
It’s a multifaceted ad platform that allows you to set up multiple ad settings to help you get the most out of your ads. Sounds complicated? Not to worry because we’ll also be guiding you on how to set up your Ads Manager account in this article. Keep on reading.
How to run a ‘Boost Post’ ad
Step 1: Click on the Boost Post button which is located at the bottom of the post you want to boost.
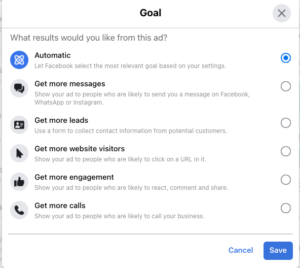
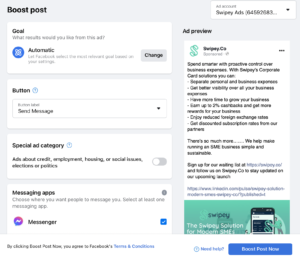
Step 2: Select your goal. You can also let Facebook automatically determine your goals for you based on your post.
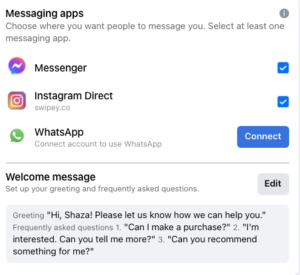
Step 3: Select how you’d like people to reach you.
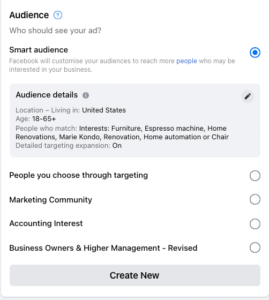
Step 4: Define your target audience.
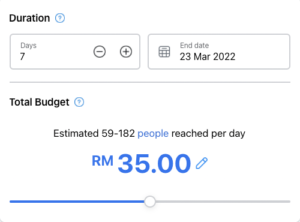
Step 5: Set your budget for the ad campaign. Your budget can be as low as RM10 a day depending on your goals.
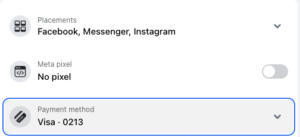
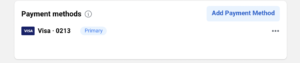
Step 6: Select your payment method by clicking on the dropdown.
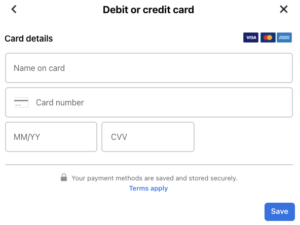
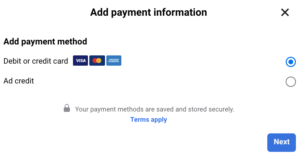
Step 7: Select Debit/Credit Card and click Next.
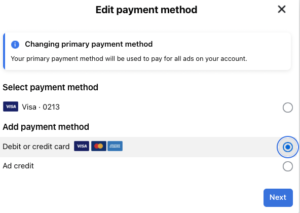
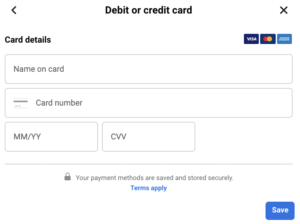
Step 8: Insert your Swipey VISA-powered Prepaid card details and click Save.
Step 9: Submit the ads for approval by clicking Boost Post Now.
All ads will go under review. Depending on the ad and your specifications, the Facebook review can take a few minutes and sometimes can stretch up to 24 hours. Once approved, your ads will be shown to a wide audience as set by you.
How to run ads on Ads Manager
- Create a Facebook Business Manager account.
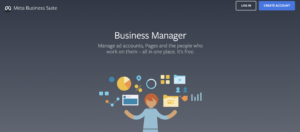
Step 1: Go to business.facebook.com/overview and click Create Account.
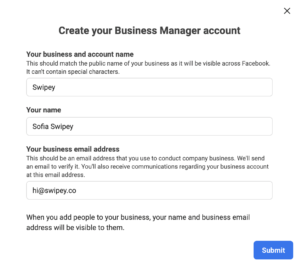
Step 2: Enter a name for your business, your name and work email address, and click Submit.
Once you’ve created a Business Manager account, you can now set up your ad account.
- Create ad account in Business Manager.
Step 1: From your homepage, click on the Settings icon to go to Business Settings.
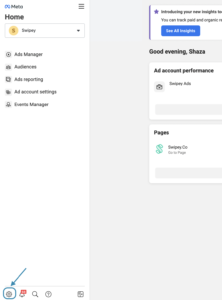
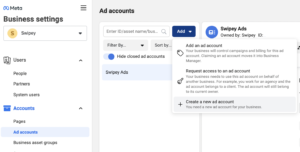
Step 2: Click the Accounts dropdown on the left-hand side menu. Then, click Ad Accounts.

Step 3: Click the blue Add drop-down menu and select Create a new ad account.
Step 4: Enter your ad account name, and select the timezone and currency you’d like to be billed in. Then, click Next.
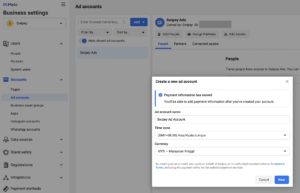
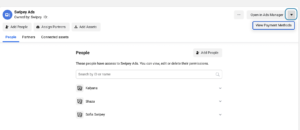
Step 5: Follow the prompts to add your page and the users that’ll be managing your ads.
- Add your payment method
Step 1: From your Ad Account page above, click on the dropdown arrow on the top right corner of the page and click View Payment Method.
Step 2: Select Add Payment Method.
Step 3: Select Debit and click Next.
Step 4: Insert your Swipey VISA-powered Prepaid card details and click Save.
- Create Ads in Ads Manager
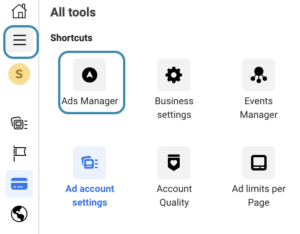
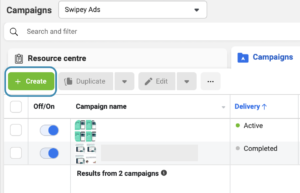
Step 1: Go to Ads Manager by clicking on the 3 horizontal lines icon at the left of the page.
Step 2: Click the green button called +Create.
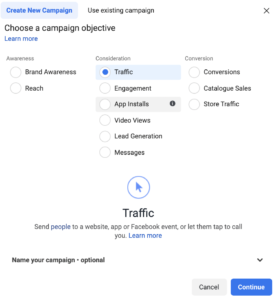
Step 3: Choose your campaign objective and click Continue.
Step 4: Set up your Campaign, Ad Set, and Ad details settings, then click Publish.
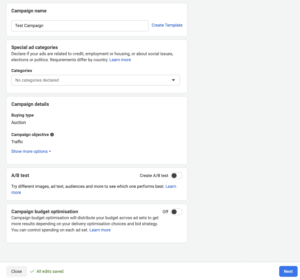
Campaign: This is where you choose the goal that you want to reach from your ads.
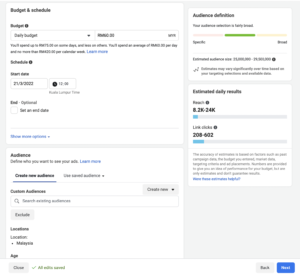
Ad set: This is where you determine who you want to show your ads to, how much you want to spend, and where you want your ads to appear (you can select automatic placements if you want your ads to appear everywhere on Facebook).
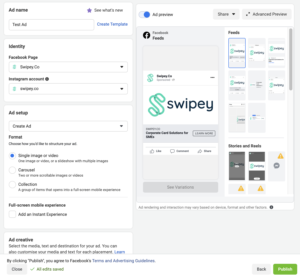
Ad: This is where you insert your creatives and ad copy. You can also select the type of ads that you want to run here, for example: Carousel, Video, or Instant Experience ads.
Once your ads start running, it’s advisable to continue monitoring their performance and make ‘optimizations’ when required. Remember, ads are charged every few days or when it reaches its spending threshold so you may see a few billing statements on your Facebook Billing section for one campaign.
For easy tracking of your Facebook ad charges, you can easily view your charges via Swipey’s Expense Management dashboard. Here you’ll get to view all your transactions in real-time and manage your ad expenses easily at the click of a button.
Interested in getting a Swipey card to separate Facebook ads expenses from other expenses? Sign up now.
Step 2: Select your goal. You can also let Facebook automatically determine your goals for you based on your post.
Step 3: Select how you’d like people to reach you.
Step 4: Define your target audience.
Step 5: Set your budget for the ad campaign. Your budget can be as low as RM10 a day depending on your goals.
Step 6: Select your payment method by clicking on the dropdown.
Step 7: Select Debit/Credit Card and click Next.
Step 8: Insert your Swipey VISA-powered Prepaid card details and click Save.
Step 9: Submit the ads for approval by clicking Boost Post Now.
All ads will go under review. Depending on the ad and your specifications, the Facebook review can take a few minutes and sometimes can stretch up to 24 hours. Once approved, your ads will be shown to a wide audience as set by you.
How to run ads on Ads Manager
- Create a Facebook Business Manager account.
Step 1: Go to business.facebook.com/overview and click Create Account.
Step 2: Enter a name for your business, your name and work email address, and click Submit.
Once you’ve created a Business Manager account, you can now set up your ad account.
- Create ad account in Business Manager.
Step 1: From your homepage, click on the Settings icon to go to Business Settings.
Step 2: Click the Accounts dropdown on the left-hand side menu. Then, click Ad Accounts.
Step 3: Click the blue Add drop-down menu and select Create a new ad account.
Step 4: Enter your ad account name, and select the timezone and currency you’d like to be billed in. Then, click Next.
Step 5: Follow the prompts to add your page and the users that’ll be managing your ads.
- Add your payment method
Step 1: From your Ad Account page above, click on the dropdown arrow on the top right corner of the page and click View Payment Method.
Step 2: Select Add Payment Method.
Step 3: Select Debit and click Next.
Step 4: Insert your Swipey VISA-powered Prepaid card details and click Save.
- Create Ads in Ads Manager
Step 1: Go to Ads Manager by clicking on the 3 horizontal lines icon at the left of the page.
Step 2: Click the green button called +Create.
Step 3: Choose your campaign objective and click Continue.
Step 4: Set up your Campaign, Ad Set, and Ad details settings, then click Publish.
Campaign: This is where you choose the goal that you want to reach from your ads.
Ad set: This is where you determine who you want to show your ads to, how much you want to spend, and where you want your ads to appear (you can select automatic placements if you want your ads to appear everywhere on Facebook).
Ad: This is where you insert your creatives and ad copy. You can also select the type of ads that you want to run here, for example: Carousel, Video, or Instant Experience ads.
Once your ads start running, it’s advisable to continue monitoring their performance and make ‘optimizations’ when required. Remember, ads are charged every few days or when it reaches its spending threshold so you may see a few billing statements on your Facebook Billing section for one campaign.
For easy tracking of your Facebook ad charges, you can easily view your charges via Swipey’s Expense Management dashboard. Here you’ll get to view all your transactions in real-time and manage your ad expenses easily at the click of a button.
Interested in getting a Swipey card to separate Facebook ads expenses from other expenses? Sign up now.